Contents of the guide Show ▾
A materials list shows what goes into the van. A build budget also needs what doesn’t appear there: tools and consumables, delivery and returns, jobs you pay someone else to do, the registration inspection, insurance and a contingency for whatever might not go to plan.
This guide gives no amounts of its own. Costs depend on your van, your plan and your suppliers, and they change over time. Below is what other named sources say, with dates. You work out your own total by splitting the budget into six parts, filling in quotes with source and date, and tracking them against what you actually pay in the log. The build order itself is in the campervan conversion guide.
What this guide covers, and what it doesn’t
The guide is about the money around the build: which items usually get left out, how to get your own figures and how to track them. Other questions have their own pages:
- The order you build in: Converting a van into a campervan.
- Which materials and parts you need: the materials list. It deliberately has neither prices nor quantities.
- Requirements and steps for re-registration: the guide to re-registering as a passenger car class 2 (Swedish rules).
- What travel costs once the van is finished: the travel budget. Keep build costs and travel costs apart so nothing is counted twice.
The guide does not size any installations or approve any solutions. Electrical and LPG matters are only covered as budget items.
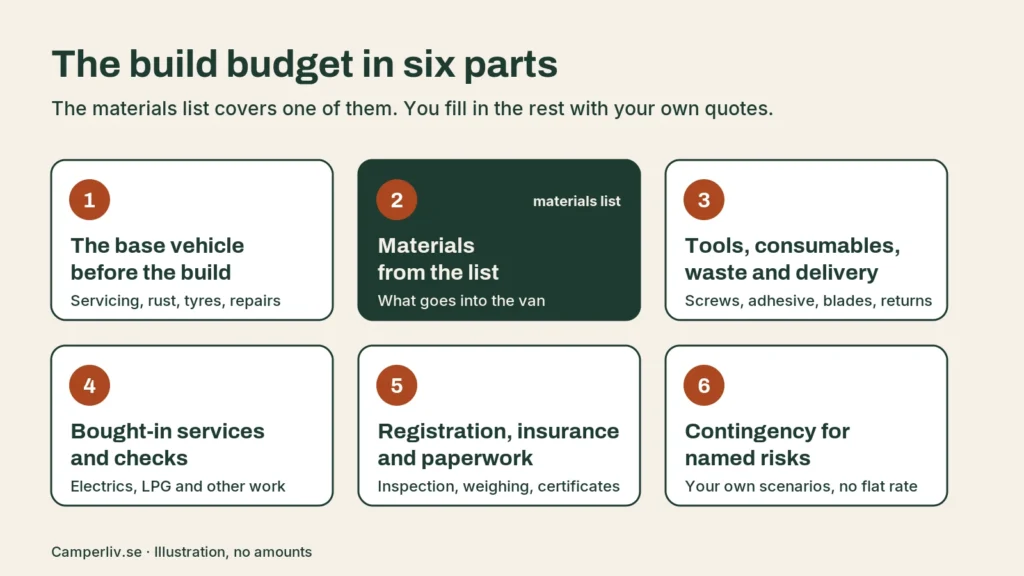
Split the budget into six parts
Put every item into one of these parts. Then you can quickly see where information is missing.
- The base vehicle before the build. The purchase, but also what needs doing before you start building: servicing, rust, tyres and faults found in a pre-purchase inspection.
- Materials. What goes into the van. Start from the materials list.
- Tools, consumables, waste and delivery. What gets used up during the work but doesn’t stay in the van.
- Bought-in services and checks. Jobs you have someone else do or check.
- Registration, insurance and paperwork. Inspection, weighing, certificates and insurance during and after the build.
- Contingency. Money for uncertainties you can point to, not a general buffer.
Materials are often the part people calculate most carefully. The other five are harder to see in advance, which is why this guide goes through them.
The base vehicle: keep the purchase separate from the fixes
Count buying the van and converting it as two different things. What needs doing to the vehicle itself before the build starts belongs to the base vehicle, not the interior. Otherwise a rust job or overdue servicing can easily eat up the money for the interior without you noticing.
Go through the van with the buying checklist for a used campervan and enter every remark as its own line in the budget, even if you don’t have a price yet. How to choose a van is covered in Choosing a base vehicle for a campervan. Ongoing upkeep after the build is in the maintenance plan.
Items that are usually missing from the materials list
Tools
Write down which tools the build needs and whether you will buy, borrow or hire them. Also allow for wear parts such as drill bits, saw blades, sanding discs and cutting discs, and for protective equipment. If you hire a tool, it costs per day or per occasion, so the schedule affects the total.
Consumables and fixings
Screws, rivets, adhesive, sealant, tape, cable lugs, heat-shrink tubing, cleaning products and rust protection for the edges of drilled holes. Individually these are small items, but they come back in almost every job. Add them per stage of the build order rather than as a lump sum.
Waste, wrong purchases and redone jobs
Boards, insulation and mats are cut to size, and there are offcuts. Parts may turn out not to fit, and a job may have to be redone. Write down how you will handle that: can leftover material be returned, and what are the supplier’s return terms?
Delivery, collection and returns
For each supplier, check whether the price you are comparing includes delivery or not. Bulky goods such as boards and insulation can have different delivery terms from small items. If you collect yourself, allow for the trip or a hired trailer. Also note what a return costs.
Work space
If you build away from your own property or garage: rent for a space or premises, electricity and, in winter, heating. If the van needs to be under cover while it is open or unfinished, that cost belongs to the build too.
Bought-in services and checks
Go through the build order and mark every job you don’t plan to do yourself or want someone to check. That might be metalwork and cutting holes, upholstery or the electrical and LPG installation. Each such job becomes its own line with a quote.
Electrics. Under Swedish rules you do not need an electrician to install 230 V in a motorhome or campervan; that requirement applies to buildings. On its page about campsites, Elsäkerhetsverket (the Swedish National Electrical Safety Board) writes that the camper is responsible for making sure the motorhome, the hook-up cable and the connected equipment are safe to use. The agency also points out that electrical installations in motorhomes are exposed to vibration and should be checked regularly. Budget for an RCD and, if you want, a check by someone who knows electrics. More about electrics in the guide to campervan electrical systems.
LPG. MCF (Myndigheten för civilt försvar, the Swedish Civil Defence Agency, formerly MSB) writes that LPG cylinders in motorhomes should be stored upright in a separate compartment ventilated to the outside, and recommends that the system is leak-tested when changing cylinders or at least every other year. According to MCF, most Swedish vehicle inspection companies can often leak-test it in connection with the periodic inspection. Have a professional who works with LPG in motorhomes carry out or check the fixed installation, and ask for documentation that you keep. Add the leak test as a recurring item. In DEKRA’s price list (in Swedish), read on 20 November 2026, an LPG check for a caravan or motorhome (1–3,500 kg / 2–7,716 lb) costs SEK 299; the page reserves the right to adjust prices. Other inspection companies may charge differently, so ask what applies to your vehicle. The details are in the guide to LPG in a campervan.
Heater. If the van will have a fixed combustion heater, bring the documentation the inspection may want to see. This is described in the guide to diesel heaters (in Swedish).
Registration, weight and paperwork
Registration inspection
If the van is to be re-registered as a motorhome, the registration inspection is a budget item of its own. Under the regulations of Transportstyrelsen (the Swedish Transport Agency), whoever presents a modified vehicle must give a written account of the modifications, and the inspection body decides how extensive the inspection will be. DEKRA (a vehicle inspection company) describes how the inspection identifies the vehicle technically, checks it from a road safety and environmental point of view, and establishes the details to be entered in the vehicle register, among other things. That is why the cost can rarely be read off in advance. Bilprovningen (another Swedish vehicle inspection company), for example, writes that the price depends on the type of registration, the vehicle’s model and model year, and asks you to contact them for an answer.
What to do: describe the build to the inspection body before you book, ask what is included and note the answer with the date. Fees are listed by each inspection company, or given when you ask. What is required of the van itself is described in the re-registration guide. Also include the inspection checklist in your planning.
Weighing
Bilprovningen writes that the vehicle must be unladen at the registration inspection because its mass in running order is to be determined. Ask whether weighing is included or costs extra, and whether it is done at the station or on an external weighbridge.
If the van doesn’t pass first time
Allow for a second inspection. According to the regulations, the check may be limited to the parts that failed if the new inspection is done within two months with the same inspection body. Add a line for a possible re-inspection and for the time it takes to fix the fault.
Certificates and documentation
If you have fitted seats or seat belts, or made other modifications that need documentation, the inspection may want to see a certificate that the requirements are met. Under Transportstyrelsen’s regulations, such a certificate can come from the vehicle maker, the component maker or a technical service, among others. Ask in advance whether you need a certificate and what it costs to obtain.
Weight and driving licence
Weight affects more than payload. According to Transportstyrelsen, a passenger car class II with a gross vehicle weight under 3.5 tonnes (7,716 lb) can be driven on a category B licence, while a heavier one needs C1 or C. If a build risks ending up over the limit your licence allows, it can mean entirely different costs. Check it early in the weight calculator and read the guide to weight and axle loads (in Swedish).
Vehicle tax
The tax can change when the vehicle type changes. Transportstyrelsen points out that other rules on taxes and fees apply if the motorhome is registered as a goods vehicle. Check what applies to your van with Transportstyrelsen before you calculate the annual cost. The re-registration guide has a section on tax after re-registration.
Insurance during and after the build
According to Konsumenternas (the Swedish consumer insurance advice service), a motorhome that is in use on the road must have motor insurance, and to be compensated for damage to your own vehicle you need part or fully comprehensive cover. Konsumenternas also writes that many policies don’t cover damage inside the motorhome if it is eight years old or older.
For the budget, that means three things to ask your insurer:
- What applies while the van is being converted and is registered as something other than a motorhome.
- How the interior and installations are valued after the build, and which receipts or documentation they want.
- What the premium will be once the van is re-registered.
Keep receipts and quotes from the build. They make the budget easier to track and may be needed if something happens.
Contingency: start from risks you can point to
A general percentage says little about your particular build. Instead, make a list of concrete uncertainties and give each one its own estimate:
- Rust or damage that only shows once the panels are off.
- A job that has to be redone.
- A new inspection or a certificate you didn’t count on.
- Price changes between quote and purchase. Check how long the quote is valid.
- Delivery and returns for parts that don’t fit.
For each line, write what happens if the risk occurs and what it would cost according to your own quote or enquiry. The sum of the lines is your contingency. Cross off lines as the risk disappears, for example once the floor has been opened and the metal checked.
Workflow: from list to outcome
1. Export the materials list
Tick what is to be built in the materials list and copy the list. It becomes part 2 of the budget.
2. Add the other five parts
Go through the sections above and enter the items for the base vehicle, tools and consumables, bought-in services, registration and insurance, and the contingency. Enter items even if the price is unknown. An empty line is better than a missing item.
3. Get quotes on the same basis
Ask several suppliers to price the same list, so the quotes can be compared. For each quote, note:
- the date and who gave it
- what is and isn’t included
- whether the price includes VAT and delivery
- how long the quote is valid.
What others say (November 2026)
This guide doesn’t calculate amounts of its own. The figures below are quoted from named sources, read on 20 November 2026. They describe different things and are therefore not added together. They are Swedish figures in Swedish kronor (SEK).
CamperPals (in Swedish; published 2 November 2024, updated 9 September 2026) estimates materials and equipment for a self-build in Sweden at roughly SEK 20,000–50,000 for a simple campervan, SEK 50,000–120,000 for a more complete holiday build and SEK 120,000–250,000 or more for an extensive conversion. According to the source, the van itself, repairs, bought-in labour and a budget contingency come on top. CamperPals writes that the ranges are their rough budget estimates, not statistics on what everyone spends.
Wilderness Wheels (in Swedish), in its price guide for 2026, gives starting prices for a complete build by them, not for a self-build: about SEK 200,000 for a van of around 5 m (16 ft 5 in) and about SEK 250,000 for a van of around 5.5 m (18 ft). The page, updated 14 September 2026 according to its own information, calls the amounts guide figures and writes that the final price depends on size, interior, materials, electrical system and equipment, among other things.
You work out your own total with the quotes and the outcome log below.
4. Fill in the budget log
Use a table with one line per item. The columns below go a long way:
| Item | Part (1–6) | Assumption | Quote or price: source and date | Valid until | Decision | Outcome | Difference and reason |
|---|---|---|---|---|---|---|---|
| Example: insulation | 2 | Quantity from the floor plan | Supplier, quote date | Bought / pending | Amount on receipt | More waste than planned | |
| Example: sanding discs and drill bits | 3 | One line per stage | Shop price, date | ||||
| Example: check of the 230 V installation | 4 | Someone who knows electrics (optional) | Quote, date | ||||
| Example: registration inspection and weighing | 5 | Changed vehicle type | Answer from the inspection body, date | ||||
| Example: re-inspection | 6 | If the van doesn’t pass first time | Answer from the inspection body, date |
The examples only show what the lines can look like. Fill in your own details.
5. Check before each stage
Before you start a new stage of the build order: compare budget and outcome for the previous one, update the contingency and check that the quotes for the next stage are still valid.
6. Finish with a final total
When the van is finished and inspected: add up the outcome per part and write briefly what turned out differently from the plan. It is a good basis if you build again, sell the van or need to explain its value to your insurer.
Checklist before you start building
- Buying the van and fixes to the base vehicle are on separate lines.
- The materials list is exported and entered as part 2.
- Tools, consumables, waste and delivery are included per stage.
- Every job you buy in or want checked has its own line and a quote.
- You have asked the inspection body what the registration inspection and weighing include and cost, and noted the answer with the date.
- You know whether any certificate is needed, for example for seats and seat belts.
- The planned weight has been checked against the gross vehicle weight and your licence.
- You have asked your insurer about the period during the build and after re-registration.
- The contingency consists of named risks with their own estimates.
- Travel costs after the build are in the travel budget, not here.
Frequently asked questions
What does it cost to build a campervan?
There is no single figure that applies to everyone. The cost depends on the van, the scope, how much you do yourself and which suppliers you use. This guide gives no amounts of its own. CamperPals (updated 9 September 2026) estimates materials and equipment for a self-build in Sweden at roughly SEK 20,000–50,000, SEK 50,000–120,000 or SEK 120,000–250,000 or more depending on the level, and writes that the van, repairs, bought-in labour and a contingency come on top. Wilderness Wheels (price guide 2026) gives starting prices for a complete build by them of about SEK 200,000 for a van of around 5 m (16 ft 5 in) and about SEK 250,000 for a van of around 5.5 m (18 ft). Work out your own total by splitting the budget into the six parts, getting quotes and filling in the log.
Why are there no prices in the materials list?
Prices differ between suppliers and change over time, and quantities depend on your van and your plan. The list is meant as a basis when you ask for quotes.
Does the registration inspection belong in the build budget?
Yes, if the van is to be re-registered as a motorhome. Ask the inspection body what the inspection and weighing include and cost for your particular build, and allow for a possible re-inspection.
How big a contingency do I need?
It depends on how much is uncertain in your build. Make a list of concrete risks and estimate each one, rather than adding a percentage.
New checklists and guides, plus reminders before winter storage and inspection. A few emails a year, nothing more.
The content is based on my own experience and the rules that applied when the text was written. Rules can change, and I am not responsible for factual errors or rule changes that affect your build or maintenance. Read the full disclaimer.

Linus Thell
Founder of Camperliv.se. Has worked with vehicles for essentially all of his adult life.
Read more about Linus →