Contents of the guide Show ▾
Building a campervan and building a plåtis (a Swedish name for a van with a solid metal body, converted for living) are the same kind of conversion: a panel van fitted out to live in. This page is the overview – the order of work, and what you need to have decided before you start. Choosing the base vehicle, the Swedish rules in detail, the electrical system and a forthcoming build-budget guide each have their own pages. This guide is about planning the work in the right order, not about one particular build.
What is the difference between a campervan and a plåtis?
In everyday language, building a campervan and building a plåtis is the same job: a panel van with a living area. Plåtis usually points to the body being a closed metal van. Campervan is the same type of vehicle, with a more international flavour. In this guide they are treated as the same conversion task.
What differs is not a separate sequence of work, but the size of the vehicle, how you plan the weight, and how the interior will be used. When the conversion is permanent and is to be registered as a motorhome, the Swedish category is passenger car class II (personbil klass II), whichever of the two words you use.
Before you start: plan, weight and time
Decide what the vehicle will be used for before the first hole is cut: season, number of people, where water and cooking will sit, and whether the vehicle is to be re-registered as a motorhome. Draw a simple layout and calculate the weight at this stage. Every panel, tank, battery and piece of furniture counts against the maximum authorised mass that the driving licence and the registration allow.
Use the weight calculator and read the guide to weight and axle loads on a motorhome. The aim is to see the margin against the maximum authorised mass, not to guess a finished packing list. Tips for keeping the weight down are in Saving weight in a campervan.
Plan the time in stages: cutting holes and rust protection, insulation and ventilation, electrics and heating, then the interior and the wet area. How long a build takes depends on its scope, the time you have and which parts you buy ready-made. No typical hour counts are given here.
Cost items to include in the plan, without amounts: the base vehicle and any repairs, materials and consumables, bought-in work, documentation and the registration inspection, plus a reserve for changes. Amounts and follow-up belong in the planned build-budget guide, not in this overview. A materials list can help you keep track of quantities, not prices.
Choose the right panel van
Which panel van is suitable depends on length, roof height, axle loads, condition and how you intend to use the vehicle. That assessment is made in the guide to which panel van is suitable to convert.
Here, three checks are enough before you start building: will the planned interior fit, is there a weight margin after the conversion, and does the registration match what you intend to do? A vehicle that is already heavily laden as a work van can be hard to keep within the permitted maximum mass once the living area is in place.
Rules and re-registration in Sweden
If the panel van is to be used as a motorhome with a permanently fitted living interior, the registration needs to match how the vehicle is built. In Sweden, motorhomes are typically registered as passenger car class II (personbil klass II or personbil klass 2). According to the Swedish Transport Agency (Transportstyrelsen), a motorhome can also be a goods vehicle, in which case other requirements apply. The details of rules, driving licences and inspection belong to the rules guide for motorhomes and campervans and the re-registration guide for passenger car class II.
Converting a panel van into a motorhome is the same type of conversion this overview describes. It is also the usual aim if you want to build a motorhome from a panel van that is already in use.
The Swedish Transport Agency describes passenger car class II as a passenger car that is permanently fitted with a body arranged as living accommodation and equipped at least with:
- permanently mounted seats
- permanently mounted berths, which may be seats that can be converted into berths
- permanently mounted equipment for cooking and storage
- a table
The legal wording places “permanently mounted” in front of the seats, the berths and the cooking and storage equipment, but not in front of the table. No standing height or bed dimensions are given in that definition. How the registration inspection is judged as a whole is described in the re-registration guide.
The driving licence often sets the practical weight limit; licence categories and exceptions are in the rules guide and the re-registration guide.
Once the interior is in place, the change is made at a registration inspection (registreringsbesiktning). Deadlines, documents and common mistakes are in the re-registration guide. Print the checklist for re-registration as a motorhome (PDF) and, if you wish, also use the inspection checklist. The PDF is in Swedish until an English version is available.
A step-by-step order of work
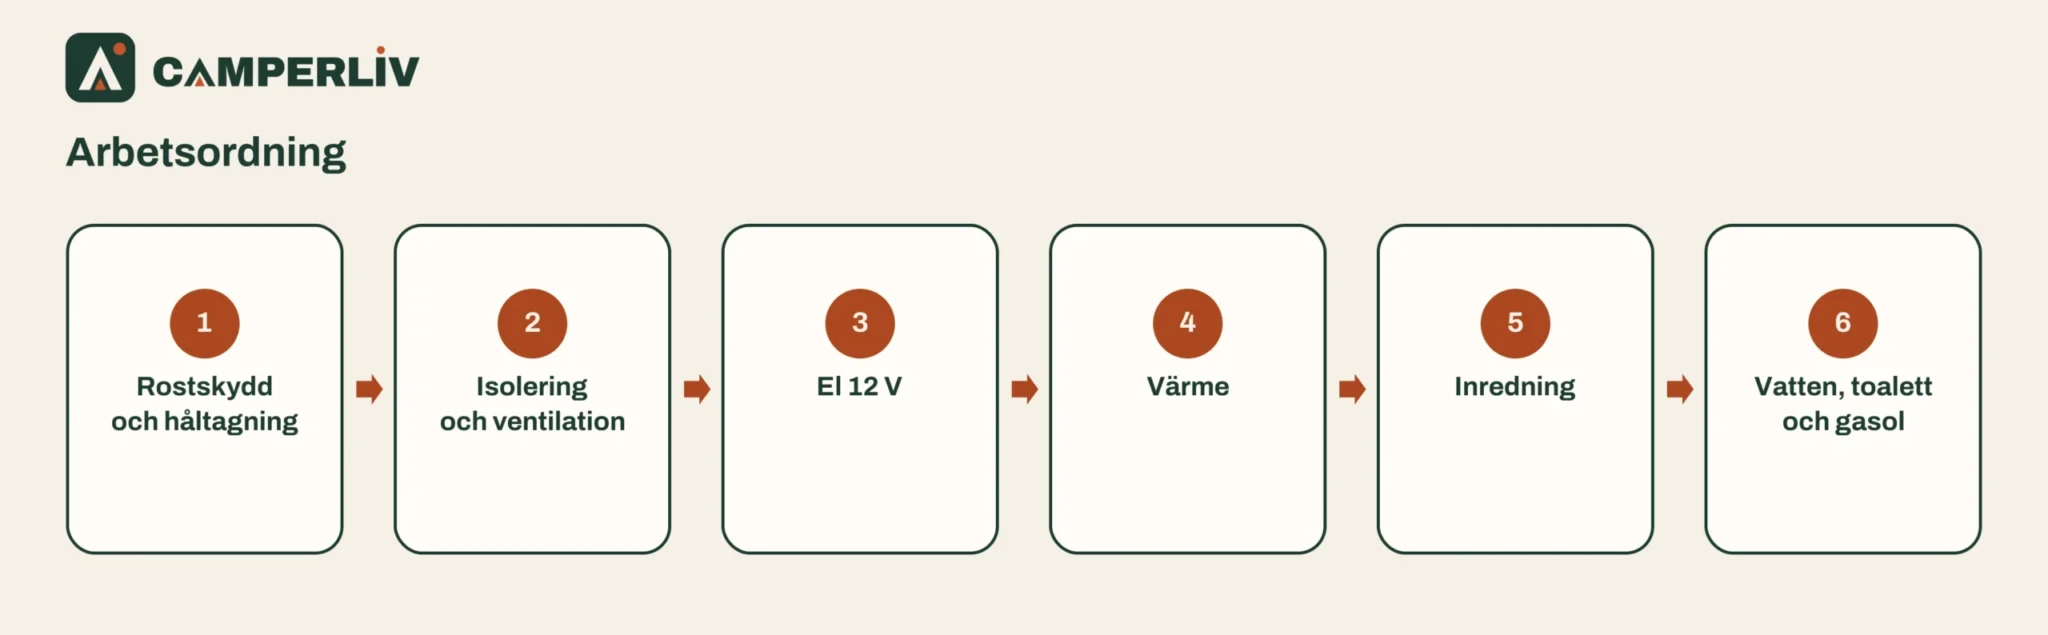
Work from the structure outwards: first whatever sits in or through the metal, then insulation and installations, and only then surface finishes and furniture. If you do it the other way around, you often have to open up finished surfaces to reach holes, cables or service points.
Rust protection and cutting holes
Cut holes for windows, a roof vent and other penetrations before insulation and inner walls are in place. Seal and rust-protect the edges while you can still reach the metal. Risk areas and the order of work when cutting holes are in the guide to rust protection on a converted van and panel van.
Insulation and ventilation
Insulate once the holes have been cut and the metal has been treated, not before. The aim is to reduce condensation against cold metal and to allow the air to change. Materials, cold bridges and the order of work are described in Insulating a campervan without condensation. A roof vent or roof fan belongs with the ventilation; fitting and sealing are in Roof vents and windows in a campervan. After a season you can follow up with a damp test.
12 V electrics
Run the electrics while walls and floors are still open, with service access to fuses, the battery and connections. The electrical section here is planning, not a design or an approval of the installation. This overview makes no new electrical or safety claims.
The overview of the 12 V system is in the campervan electrics guide. For daily energy and simultaneous loads you can use the power calculator: it gives a simplified planning estimate based on your assumptions, it does not choose products, and it does not verify the installation. Cable size and fusing are not assessed there.
The National Electrical Safety Board (Elsäkerhetsverket) notes that electrical installations in motorhomes are exposed to vibration in transit and should therefore be checked regularly. That is a maintenance reminder, not instructions for how the installation should be built. A solar panel on the roof belongs in the same stage as roof penetrations; the practical work is described in Fitting a solar panel on a motorhome, without this page approving any particular installation. See also Elsäkerhetsverket’s page Säker el på semestern (in Swedish) and their English overview of electrical safety in Sweden.
Heating
Plan the heating together with penetrations, fuel and electrics, before furniture closes off access. For diesel and other combustion heaters, the destination page is the guide to diesel heaters in a motorhome. That page covers type approval and which documents you should keep, including the box “Important at inspection: the heater must be type-approved”. This page does not approve an installation and does not set its own rules on exhaust or carbon monoxide.
Existing Truma systems in finished motorhomes are covered separately in the guide to Truma heaters.
Interior, layout and bed
Once the installations have been run, you can build walls, a kitchen module, a seating area and a bed. Plan so that fuses, vents, the heater and tanks can still be reached. Fitting out a panel van in a way that still allows service access matters more than filling every surface. The campervan interior is therefore planned together with the electrics, heating and wet area, not as a last, separate joinery job. Layout, bed type and storage are in Layout and beds in a campervan. A forthcoming guide on permanently mounting the interior is planned; it has not been published yet and does not replace this overview.
If the vehicle is to be re-registered, keep the four requirements for passenger car class II in mind already at this stage: seats, berths, cooking and storage, and a table must form part of the permanent interior, according to the Swedish Transport Agency’s definition.
Water, toilet and LPG
Plan water and waste together with the floor, heating and penetrations, so that tanks can be emptied and pipes are not built in without access, where they can freeze. See water systems in a motorhome and toilets in a motorhome. Fridges that affect electrics, ventilation and possibly LPG are described in Motorhome fridges.
LPG (in Swedish: gasol, typically propane) is among the installations that have their own safety requirements. This overview does not repeat them and does not approve an installation. Follow the guide to LPG in a campervan and the official sources it cites.
Common mistakes
- Insulating too early. Holes, sealing and rust protection become harder once insulation and boards are already in place.
- Choosing materials that are too heavy. A layout that looks spacious on paper can use up the weight margin. Keep checking in the weight calculator.
- Forgotten service access. Heaters, fuses, wiring and tanks built in without hatches become hard to maintain and to inspect.
- Leaving weight and registration until last. If the vehicle is to become passenger car class II, the permanent interior and the documents need to be thought through from the start, not after everything has been glued in.
- Missing documentation for the heater. A permanently mounted combustion heater without type-approval documents can fail the registration inspection.
Tools that help during the build
- Weight calculator – ongoing checks against the maximum authorised mass.
- Power calculator – planning daily energy and simultaneous loads, not a design calculation.
- Materials list – quantities and items, not prices.
- Inspection checklist and the re-registration PDF checklist – before the registration inspection.
- Further lists are collected under the Checklists tool.
The build guides themselves are in the Build category. Care after the build is finished is described in the campervan maintenance plan.
Frequently asked questions
Is building a campervan the same as building a plåtis?
In this guide, yes: both mean a converted panel van with a living area. The words are used differently in everyday speech, but the order of work and the Swedish registration requirements are the same for that type of conversion.
In what order should I build?
A common order of work is: plan and weight, choice of vehicle, a decision on re-registration, rust protection and cutting holes, insulation and ventilation, electrics, heating, interior, and then water, toilet and LPG. Cut holes and run services before finishes and furniture close off access.
Does the vehicle have to be re-registered?
If the vehicle is given a permanently fitted living interior and is to be used as a motorhome, the registration should match how the vehicle is built. For a converted panel van, passenger car class II is the usual aim. What is required, and how the registration inspection works, is described in the re-registration guide.
Which panel van is suitable?
It depends on size, weight margin, condition and use. That question belongs to the guide Choosing a vehicle for a campervan.
What affects cost and time?
The scope, the condition of the base vehicle, how much you do yourself, which parts you buy ready-made, and how much has to be redone. This page gives no price ranges or typical hour counts. Cost items and follow-up belong in the planned build-budget guide.
How do I calculate the weight?
Start from the vehicle’s maximum authorised mass and mass in running order, add the interior, installations, water, LPG and luggage, and compare that with the permitted payload. Do this in the weight calculator and read the guide to weight and axle loads. The driving-licence limit, often 3,500 kg for category B, must not be confused with the payload you actually have left after the conversion.
Sources
Checked on 10 November 2026 where a date is given; otherwise reused with the original check date. See the internal source log.
- Swedish Transport Agency, Personbil (opened 10 November 2026). English overview: Vehicles.
- TSFS 2016:22 consolidated (PDF), Annex 1, point 36; content previously read on 6 November 2026, URL checked on 10 November 2026. The details are set out in the diesel heater guide, not in this overview.
- National Electrical Safety Board (Elsäkerhetsverket), Säker el på semestern (opened 10 November 2026). English overview: Electrical safety in Sweden.
New checklists and guides, plus reminders before winter storage and inspection. A few emails a year, nothing more.
The content is based on my own experience and the rules that applied when the text was written. Rules can change, and I am not responsible for factual errors or rule changes that affect your build or maintenance. Read the full disclaimer.

Linus Thell
Founder of Camperliv.se. Has worked with vehicles for essentially all of his adult life.
Read more about Linus →